


Here's a photo of the finished product. Thought I'd post a pic on the blog page first, then get into the "how to" and "what to" bits...

So, I've been spending the past couple of months building a brick oven at my home in Warrnambool in Victoria's South-West in Australia. So I thought I'd pop up some photos of how it's gone, the things that have worked well, and what I'd do differently if I were to build another one sometime down the track.
I built the foundations of the oven out of normal cement blocks sitting on a reinforced cement slab. The blocks were stacked using a mortar mix of sand, cement and lime. I built the cement block with an opening in the front underneath so I could store wood and an ash box, which meant I had to use a steel lintel (a flat piece of steel) to hold up the arch blocks of the fourth course. Here's some pics...

The framework for the cement slab.

The cement slab with reo bar inlayed.

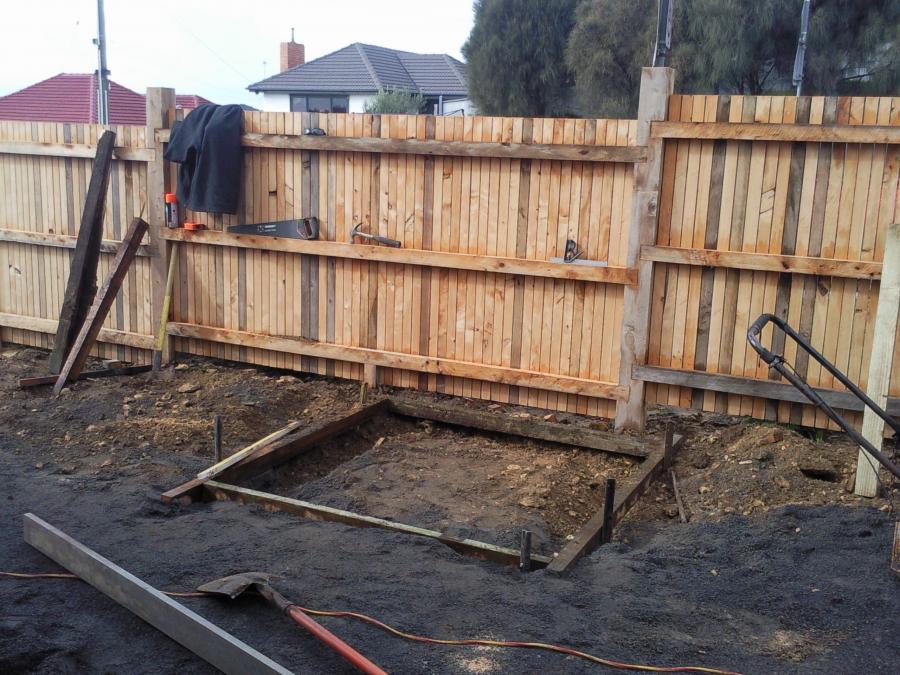
First course of cement blocks with opening in front.

Fourth course of blocks with arch running across a steel lintel. Notice the rebar between the third and fourth course, in place to hold up the plywood floor which forms the perlite cavity.
Replies
So, the next step was to make some insulation for underneath the floor slab. I did a bit of reading and decided to go with perlite, which I was able to get from a local garden supplies place in 100ltr bags. The bulk bags made it very affordable compared with buying little bags, as you do need a lot of perlite! I lay a plywood base on top of my re-bar which sat between the third and fourth course of blocks, then poured in the perlite and topped it with a fire-retarded heat resistant cement sheet. This gave me about 200mm of pure perlite insulation beneath the oven floor.
Next I lay a perlite/cement slab which was 6 parts perlite to 1 part cement, mixed to a thick sort of porridge consistency. This mix seemed very light and airy at the time, and I wasn't sure if it was going to work, but I decided to move on and see what happened. The results for the perlite/cement slab were amazing. It is very light but very hard and strong. Here are some pics...
Plywood base and the cavity for the perlite. Rebar layed across the top of the fourth course of blocks to hold up the cement sheeting on top of the perlite. Also notice the verticle rebar and cement which is in every other block cavity, running right through to the ground. This provides stability in the blockwork.
The plywood floor for the perlite cavity. And the rebar.
The cement sheeting is now in place over the perlite (300litres of perlite), then I did a half height course of blocks. The perlite/cement floor slab will be poured into this half block cavity.
The perlite/cement insulative slab. This also has rebar running through it, though I'm not sure i needed it.
Now is when it gets exciting. I was able to get my hands on some red bricks from a friend who had pulled an old fireplace out. That's what's forming my walls. For the floor, I went to a paving supplies and bought standard pavers. My floor is two pavers thick, to maximise the amount of heat I can store in the floor. The dome of the oven is going to be built with half bricks using a wooden guide as a sort of arm running from the centre of the oven to the bricks. You lay the first course of half bricks with mortar, using the guide form the centre point of the oven floor. Then cut in the pavers for the floor. The reason for cutting them into in the floor, is so the floor pavers are easy to replace should you need to if one breaks down the track. If the floor pavers ran under the oven walls, they would be more difficult to replace.
I had a steel arch made for my door opening using the dimensions out of Russell Jeavons book "Your Brick Oven". I laid half bricks over the arch and filled the spaces with mortar. My floor pavers were layed at a 45 degree angle to the opening of the oven, so that they won't catch on my oven peel when I'm working the oven. I layed the top course of pavers at a 90 degree angle to the bottom course too, for greater stability.
I set the first course of bricks in a circle using my guide, then laid my pavers in. Then I found the centre of the oven and drilled a small divot in the floor pavers so that I have an easy mark to run my guide from for the rest of the wall bricks. The second course was laid, then the third and so on. The higher the courses get, the more they arch into the centre. It gets to a point where you can't lay any more courses without the bricks being pulled in by gravity. So I propped up some cement blocks inside the oven then cut a circular piece of plywood and made a dome cap out of sand to support the final bricks. Here are some photos...
First course of bricks with first layer of pavers getting cut in to fit.
Second layer of pavers cut into the first course of bricks.
Third course with doorway steel lintel arch.
The final course of bricks I could lay before they started to fall in because of gravity. (The rain didn't help either!)
The sand dome cap for the final courses of brickwork.
All the brickwork complete, with the first layer of mortar/insulation. Now to put a thick layer of perlite/cement insulation over the top...
Looks great wish I was even a little bit handy and had the confidence to have a go at something like this.
Thanks Johnny, it's actually surprisingly not that hard. This was the first time i'd layed bricks or even mixed cement for that matter. It's all straight forward and if you have some good texts and tuides, it's pretty simple. Though cost-wise it's been just short of $1000 so far, and that's with the free bricks! Oh well, all worth it. We fired it up last night for it's pre-insulation fire, to see if any cracks appeared in the mortar. Thought we'd pop in a couple of pizzas while it was hot. They were amazing, and so worth all the work. I can't wait to get some loaves into it. I'll post up the results, successful or not, as soon as i have.
Mister P.
I too have been planning a brick oven only I will be having the opening inside of my kitchen. so far all I have done is dig the footing. I was advised to have 3 feet if cement in it to support the weight-the base will be solid with cinder block filled with cement and reinforced with rebars. One of my big questions is how did you determine the best height for your dome? I know proper convection depends on this. How is the cement/perlite insulation working out? I have a lot of free bricks from tearing out an outside wall when I enlarged the kitchen but wonder if I should use firebrick. Any advice/suggestions? I live in south Louisiana and it is still really hot outside so I am waiting for it to cool off a little bit before getting down to the real work.
When I started building my oven, i bought a few books about it and had a good old read. Most of the info recommends just using normal house bricks. One book even goes as far to say "If you want to waste your money, by all means buy fire bricks. However, house bricks are fired at 1200 degrees celcius, so unless you're a pyromaniac, in is unlikely you'll get your oven up to these temperatures".
As for the height of the dome, mine is equal to the radius of the oven. This is a simple way to build the oven, as you can make an arm-like guide to hold the bricks up from the center point of the oven and just go round in a circle for each course of bricks (you can see the arm I made in the picture titled "Third course with doorway steel lintel arch"). I do know, however, that it is better with bread baking to have a lower oven height. There are some very detailed plans in Tom Jaine's book "Building a wood-fired oven" which follow the lower ceiling height. It is a very detailed step by step book. I used an australian book by Russell Jeavons "Your brick oven - Building it and baking in it". This one had the use of the "brick guide" to create the dome. I've only cooked in it once so far (unlike you, I'm waiting for warmer weather!) and I cooked pizza, but it seemed to work fine. The perlite/cement mix has been great, so far I've only put it under the oven floor, but as soon as the weather is fine, I'll be putting a thick layer (about 200mm) of it over the dome, then rendering with normal render. I used a mix of 1:6 cement:perlite. When I laid it into the floor, it looked too light and airy and dry to do anything, but I stuck with it to see what happened, and it's a very strong base. I've put two layers of pavers over that for the floor, and around the dome I've paved with Basalt "crazy paver". It's beginning to look great and a lot less bohemian!
If I were to do it all over again, I would follow the steps I found on the Forno Bravo website to construct my base. It's handy to have an open base for storing timber. And doing it the way they show is easily strong enough to hold up the weight of the oven. Check it out:
www.fornobravo.com/pizza_oven_installation/table_of_contents.html
Good luck, it's so much fun and so satisfying. If you have any other questions, let me know. I'm no expert, but there's definitely things i've learnt along the way which may help!
Mister P.
Brilliant project Mr P - it looks fabulous!
What size is the footprint of the base? I'd love one in my backyard, but only have a small yard. Very jealous! Can't wait to see the finished product and to hear how your bread goes in it.
K.
Thanks! The base of the oven is 1500mm x 1500mm, so that I could have an oven with internal dimensions of 1100mm with enough room to fit a good amount of perlite insulation over the top. It's been crappy weather down here lately, so haven't had the chance to insulate it yet. I did get to fire it up and bake pizzas the other night, which were fantastic, but I don't want to try bread until it's properly insulated. Oh, and I need to make a door for it before I bake bread too. I'll post up more pics as the project moves along. Here's one pic from the first firing when I made pizzas. No insulation, but I have put down some basalt "crazy" pavers on the top surface of the base. Starting to look a little less "bohemian" now, i must say!
Love the pavers!
Question - if you put a door on it, where does the smoke go?
And I know what you mean about the weather, we've had it pretty crap here in Auckland lately too - especially this weekend with the big storm you guys had enough of and sent over!
K.
That storm was incredible! We had floods like I've never seen down here in Warrnambool. Hope things aren't too bad over there! I heard about the earthquakes in Chch too, very scary!!!
As for the door, you actually fire the oven for a few hours then pull out the fire, mop the floor of the oven, slide your bread in and put a door over the front. So its not the fire that cooks the bread, it's the residual heat in the bricks and floor pavers that cooks it. That's why it's so important to make a good oven with really good heat absorption covered with a good layer of insulation. Mine is made of brick (good heat absorption) then it's going to get a thick layer of Perlite/Cement mix (good heat insulation). The key is to have it so well insulated that you can't even feel heat on the outside of the oven when it's firing. That way, all the heat is being stored in the brickwork and oven floor, which then will mean it holds it's heat for longer and can cook longer. The Bread Builders actually state that these ovens are "Brick ovens" not "Wood ovens", because of this point.
We cooked pizza last week, and cooking pizza is different. You initially heat the oven with a big fire in the middle, then push the fire to the back and cook from there. So with pizza you do get smokey flavours as the fire keeps on heating away. It also means you can keep cooking for as long as you feed the fire.
Go and build yourself one! It's so satisfying. God I can't wait for my first loaves (though I'm predicting some failures first!!!) Go do it!
Mr P.
So how do you "pull" the fire out of the oven? Is it down to coals by the time you haul/scrape it out? And do you have a thermocouple in the oven to check the temp? I'm going to have to go and sit and stare at my yard when it stops raining, and figure out if I can fit one in!
K.
Karnie, that is yet to be experienced. I am planning on attaching some hooks to the front of the base so I can hang a tin box off it and "drag" the ashes into the tin box. But I'm not sure how it's all going to go yet. A lot of designs include a hole in the floor just outside the door where you put an 'ash box' with a lid, so you can drag the ash into it easily. But yes, it's mainly ash and small cinders by the time you remove it. I'm starting to see the benefits of having such an ash box, but alas, it is too late for me!!! I'd suggest an ash box. The book by Russell Jeavons that I bought is well worth the purchase ( our Brick Oven) if you are serious about building one. It's not so step by step, but it gives enough info to really get an idea of it. I'd be happy to share my experiences in more depth if you wanted too, as there is certainly things I'd do differently if I were to build another one. But I guess that's all part of it, learning from mistakes etc.
As for a thrmocouple, I didn't bother with one. Some references do say to build it into the oven, but others give techniques to check the oven temp too (some as simple as throwing some flour on the oven floor and seeing how long it takes to brown!) Part of this experience for me is about experimenting, and working it out as I go. So my plans are just to fire the oven for a few hours and get it up to temp, then learn by trial and (hopefully not much) error. Again, I'll post pics as I go. But seriously, if you want more detailed descriptions of the steps I took, I'd be happy to share.
Here's some other pics from my firing tonight (pizza again!)
I've finally grouted the crazy pavers!
Pizza for dinner.
Now that you mention it, regular bricks should work fine. I lined my regular oven with brick and it worked just fine-just no smoky flavour. Where did/are you going to put a chimney for the smoke to escape when the door is closed?
The chimneys are used mainly in indoor or under cover ovens. Mine is outside, so there's no need for a chimney unless I want to stop the smoke coming out the door, but it hasn't been much of a problem yet. Whether or not I have a chimney has no bearing on if the door is open or closed anyway because you would only close the door if the fire had been removed from the oven for bread baking. If I do decide to put a chimney on this oven, then I have to build another doorway further out from the existing doorway which is slightly larger than the original doorway, then the flue/chimney opens up from the space between the two doorways. If the door was closed, it would be closed onto the inside doorway, and thus the flue would be blocked off from inside the oven anyway. The only time you put the door on the oven is if the fire has been pulled out of the oven. Otherwise, the door stays open. Does that make sense? Check out this pic if it doesn't, it might make more sense...
slice.seriouseats.com/archives/2009/08/my-pizza-oven-mark-wilkie-windsor-terrace-brooklyn.html
Mine seems to be going just fine without a chimney and I kind of like the smoke marks up the door arch anyway. Last time I fired it, there really wasn't much smoke at all so it wasn't a problem. I have the option of building in the chimney down the track if I decide to.
Good luck with! Make sure you post some pics and let me know as you go, i'd love to see it progress!
Mr P.
I used some red render thinking it was going to be terracotta colour, but alas, it is a maroon colour. But I love it anyway! This was two bags of 20kg premix render with 500g red oxide mixed through it. The bag instructions said to use 3.4L water per bag, but it didn't seem like anywhere near enough, so I added more bit by bit til it was the consistency I thought I needed. Then I put the render on with a trowell. Once the oven was totally covered, I lightly sprayed the render with a mist of water and went over it with the trowell again to smooth it off a bit. I like the slightly textured look of it all too. It's really starting to come together now! Next is to render the base with black oxide. Tomorrow if the weather is fine I think!
Here's a pic.
Looks fantastic, Mr Punchy! I'm terracotta with envy!
Ditto that! Looks wonderful!
The finished product! I decided I didn't like the red colour, so I bought some Solar Guard paint and painted the oven and the base. The oven is a Sandstone colour and the base a charcoal colour. Now I love it! First firing is so close I can smell it!
Some final pics...
The finished oven
and the unfinished landscaping! Still SO much to do! :(
I just had to share photos of the first baking in my brick oven. I soaked the bricks with a roaring fire for about 4 hours, then pulled the coals out, mopped the floor, and slid 8 white sourdough loaves into the oven that had been retarding in the fridge (well, the coolroom at work) over night. I proved the loaves for a further 3.5 hours, then wacked them straight onto the floor of my new oven. The results speak for themselves, I dare to say. This bread was amazing. Here's some pics, for the last time on this blog!...
the bread when I first put it in the oven.
20 minutes into the baking
40 minutes in, i'm just about to pull them out.
The 8 loaves in all their glory! They were SO amazing. Yum.
Outstanding Mr P!! that is a fantastic first bake! You must be stoked with that result - well done! That's a nice oven spring you got on those loaves, and boy they look delicious. Even more so I'm sure for all the hard work on the oven.
Imagine being able to bake that many loaves at once! That would be wonderful ........... far more efficient than two at a time.
Happiness is indeed making bread!
K.
... indeed it is Karnie, indeed it is. Now I've got family doing "the castle" thing saying "you should start a shop dear"! I don't think they understand the hard work and hours that real bakers have to do. I think I'll be sticking to the hobbyist bread baking that I know and love! Thanks for the feedback.
Mr P.
You inspire me!!
Terri
Mr P I'll have to show this thread to my husband. We have been talking about building a brick oven for years. He still hopes to make (me) one as I am the baker in the family! I normally use a 60 cm Miele oven but I really cannot bake loaves bigger than 2.5 kg. I take it you own a professional mixer too?
Top marks!!
I have completed my oven and also followed the instructions outlined in Russell Jeavons book but finding it is not retaining heat as best as it should be? I am interested in your final rendering of perlite/cement and was wondering if you could actually point me to where I can buy this product. I see you mixed cement 1:6 with perlite so did you just mix the perlite in with the cement?? I wasn't aware you could do this or is there a already manufactured render that you can purchase I compeled the outside with regular render. Just a novice - it cooks quite well but takes a few hours to get really hot and then the heat seems to fade so I thought what you have done may assist? Look forward to your advice. Thanks
GA
Hi mate,
I've almost finished my own selfmade oven at home and have incorprated a steel arch at the front of the flue, like yours originating from reading Russell jeavond book. if you follow the link to fronobravo site you can see what I mean.
What do you think in regards of the stainless expanding too much and cracking the bricks.
Have you experienced that? Does anyone else have an opinion.
I've spent so much time making the oven, it would be ashamed if it stuffed up?
regards
Matt
Oh dear it's been a long time since I was on here!
Graeme, in regards to the perlite mixture, yes it is just perlite mixed w cement. The perlite I purchased in bulk from a nursery and the cement from hardware. I put a wire mesh over the oven then put this mix over the top. It's quite thick too, but I wish I'd have done it even thicker to really contain the heat.
As for the steel arch, mine is plain steel, not stainless, but I've had no issues at all!
Oh, and Dream Dough, I don't own a pro mixer but I do have access to one it the restaurant I work in! So lucky!!!
I'd love to know how your oven has stood the test of time. Anything more you'd change from your original set-up?
Wow! This looks fantastic. You have this artistic touch of it. This fire pit would be much safer ( mobilefireunits.com ) to use, the bricks stacked are perfectly placed.